Beginner’s Guide to Power Tools: Safety and Basic Skills

Are you ready to take your DIY projects to the next level with power tools? Whether you’re a new homeowner tackling renovations or an aspiring maker exploring creative hobbies, this beginner’s guide will empower you to use power tools safely and effectively. Power tools can be your best friends or your worst enemies; they save time and effort but can be intimidating and even dangerous if not handled properly.

Safety should always come first when working with power tools. Before you begin, ensure you have personal protective equipment, including safety glasses, ear protection, and a dust mask. Always read the tool’s instruction manual, familiarizing yourself with its functions, controls, and safety features. Never operate a tool without understanding its operation and potential hazards. Each tool has specific safety precautions, so approach them with respect and caution.

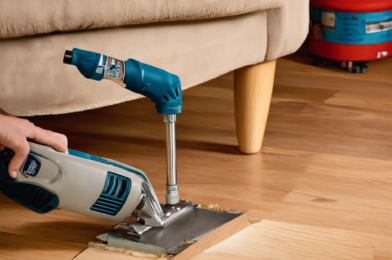
Start your power tool journey with the basics: drills and drivers. These are versatile and essential for a wide range of tasks. Learn to adjust the clutch settings and torque on your drill for various materials. Practice drilling at different angles, starting with straight holes, and then move on to angled ones. This will give you a better understanding of how to control the tool and avoid accidents.

Another fundamental skill is learning how to use a jigsaw. This tool allows you to cut curves and shapes in wood and other materials. Practice cutting straight lines before moving on to curves. Focus on maintaining control and keeping the blade straight to ensure clean cuts.

As you gain confidence, you can explore more advanced power tools like circular saws or table saws, but always prioritize safety and skill development.

Stop That Squeaky Floor: Easy Fixes Anyone Can Do

If your hardwood floors have started to squeak, it can be a real nuisance and even affect the ambiance of your home. That annoying sound can make you feel like your floors are getting old before their time, and you might worry that something is structurally wrong. But fear not! There are several simple fixes you can try to quiet those noisy boards and get your home feeling cozy again.

Squeaky floors are often caused by wood rubbing against wood, typically due to the natural shrinkage and expansion of the wood as the humidity changes. Over time, the finish nails or screws that hold the subfloor to the joists can become loose, or the floorboards may shift, creating gaps. This movement leads to friction, which results in that all-too-familiar squeaking sound.
breaking the paragraph

One easy method to fix a squeaky floor is to sprinkle talcum powder or graphite powder between the boards. These substances act as lubricants, reducing friction between the boards and silencing the squeaks. Simply apply the powder to the affected area and work it into the gaps using a broom or paintbrush. This method is best for minor squeaks and can be a quick, temporary fix.

For a more permanent solution, consider using construction adhesive to secure the subfloor to the joists. Inject the adhesive into the gaps between the subfloor and joists using a caulking gun. This method works best when you can access the floor from below. By filling in the gaps, the adhesive prevents the subfloor from moving and causing those irritating squeaks.

Another approach is to screw down the floor through the carpet or wooden boards. Locate the squeaky spot and drive screws through the flooring material and into the subfloor below. This method is more intrusive and may require some cosmetic repairs afterward, but it can effectively stop the squeaking by tightly securing the floorboards.

Remember, these are just a few DIY methods for fixing squeaky floors. If the problem persists or you’re dealing with more complex issues, it might be best to consult a professional to ensure your floors are properly repaired and safe.

Smart Storage Solutions: Build Your Own Shelves in 4 Hours

Are you tired of cluttered spaces and lack of storage? Say goodbye to messy rooms and wasted space with the ultimate DIY solution: building your own shelves! In just four hours, you can transform any area into a well-organized haven. Get ready to unleash your inner handyman (or woman) and tackle this fun and surprisingly easy project.

The beauty of building your shelves is the customization and flexibility it offers. You can tailor the shelves to fit your unique space and style. Whether you have an awkward corner, a narrow hallway, or an empty wall begging for some purpose, custom-built shelves are the answer. With a few simple tools and materials, you’ll be a shelving expert in no time!

To begin your DIY adventure, gather your supplies: wood boards, screws, a drill, a saw, a measuring tape, and a pencil. Start by measuring the space where the shelves will go and marking the wall accordingly. Cut the wood boards to the desired lengths, ensuring they fit snugly against the wall. Drill pilot holes and secure the shelves to the wall, making sure they are sturdy and level.

As you progress, you’ll see your shelves taking shape and your space transforming. Imagine the satisfaction of stepping back to admire your handiwork, knowing that you’ve not only solved a storage dilemma but also created a stylish feature in your home.

Paint Like a Pro: Step-by-Step Guide for Perfect Walls

# Paint Like a Pro: Transform Your Walls with These Expert Tips

Are you ready to tackle your next DIY project and give your walls a fresh new look? Painting walls may seem like a straightforward task, but achieving professional results requires a bit of know-how. With the right techniques and a step-by-step approach, you can transform your space and impress yourself with your newfound painting skills. Get ready to say goodbye to boring walls and hello to a vibrant, beautifully painted room!

When it comes to painting walls, preparation is key to success. Start by clearing the room of any furniture and covering the floor with a drop cloth to protect it from paint drips. Next, inspect your walls. Fill in any holes or cracks with spackling compound and sand them smooth once dried. Ensure the walls are clean by wiping them down with a damp cloth. Taping off edges and moldings with painter’s tape will create clean lines and protect areas you don’t want painted.

Now, let’s talk about choosing the right paint and tools. Opt for high-quality paint, as it covers better and is more durable. Consider the finish, too; matte or eggshell finishes are popular choices for walls as they minimize imperfections. You’ll need a paint roller with an extension pole for larger areas, a paintbrush for cutting in around edges, and a paint tray to load your roller.

Before you begin, ensure the paint is thoroughly mixed by stirring it in its can. Pour some paint into the tray, and you’re ready to start! Begin by ‘cutting in’ around the edges and corners with a brush, carefully painting a few inches towards the wall’s center. Then, using the roller, start painting in a ‘W’ pattern, filling in the open spaces between your brushwork. Continue this process, maintaining a wet edge to avoid lap marks.

To achieve a flawless finish, apply two coats of paint. After the first coat, assess the wall for any missed spots or uneven coverage. Once the first coat is dry, lightly sand the walls to smooth out any raised fibers, then wipe away the dust with a damp cloth. This will ensure the second coat adheres well and provides an even finish.

Essential Tool Kit: What Every DIY Homeowner Really Needs

Whether you’re a seasoned handyman or just starting to dabble in DIY home improvement, having the right tools is crucial for any project. No more borrowing from your neighbor or running to the hardware store at the last minute. So, what exactly should you have in your tool arsenal to tackle common household tasks? Here’s a comprehensive guide to the essential toolkit every homeowner needs.

Let’s begin with the basics. A sturdy set of screwdrivers—both flathead and Phillips—is an absolute must-have. You’ll be tightening screws and assembling furniture like a pro. A hammer is another fundamental tool; opt for a lightweight option with a comfortable grip to make those nail-pounding tasks easier on your arm. Pliers, in various sizes, will come in handy for gripping, bending, and cutting wires, especially during electrical projects. And don’t forget the measuring tape – a 25-foot one should suffice for most measurements around the house.

Now, for the power tools, which can make your DIY adventures faster and more efficient. A drill/driver kit tops this list. You can use it for everything from hanging pictures to assembling furniture and even for more complex tasks like installing cabinets. Look for one with adjustable torque settings and a keyless chuck for quick bit changes. A jigsaw is another versatile addition, perfect for cutting curves and intricate shapes in wood, metal, or plastic.
####

Safety should always be a priority when working with tools. Protect your eyes with safety glasses, especially when dealing with flying debris or sawdust. A respirator mask is also recommended when working with materials that produce fine particles or strong fumes. For heavy-duty jobs or when lifting and carrying heavy items, a pair of work gloves can prevent blisters and provide a better grip.

With these essential tools in your kit, you’re well-equipped to handle a wide range of home improvement projects. From simple repairs to more ambitious renovations, you’ll have the confidence and capability to get the job done. Remember, investing in quality tools is an investment in your home and your DIY capabilities. Happy building, readers!

Bathroom Makeover Under $500: Complete DIY Guide

Are you dreaming of a bathroom transformation but working with a tight budget? Renovating a bathroom doesn’t have longer to mean breaking the bank. With a touch of creativity, careful planning, and some elbow grease, you can achieve a stunning bathroom makeover under $500. Here’s your comprehensive DIY guide to making it happen!

**Assess Your Bathroom’s Needs:** Begin by evaluating what needs to be updated or replaced in your bathroom. Is it the fixtures, tiles, or perhaps just a fresh coat of paint? Prioritize the essential changes to stay within your budget. For instance, if your tiles are in good condition, consider regrouting instead of retiling to save costs.

**Set a Realistic Budget:** With your bathroom needs identified, allocate your budget wisely. While $500 may seem limited, it’s entirely feasible for a DIY project if you’re strategic. Focus on high-impact, low-cost improvements and be prepared to get your hands dirty. This budget-conscious approach ensures that every penny stretches as far as possible.

**Start with a Clean Slate:** Before diving into the makeover, ensure your bathroom is clean and clutter-free. Remove any unnecessary items and give the entire space a thorough cleaning. This step might seem basic, but it lays the perfect foundation for your DIY transformation, making the process smoother and more rewarding.

**Paint for a Fresh Look:** A fresh coat of paint can instantly transform your bathroom. Opt for high-quality, moisture-resistant paint to combat bathroom humidity. Choose a soothing color palette to create a spa-like atmosphere. With paint and a few brushes, you can drastically change the look and feel of your bathroom for a fraction of the cost of other renovations.

Stay tuned for the next section, where we’ll dive into more DIY tips to ensure your bathroom makeover is a success without costing a fortune!

10 Easy Home Repairs You Can Do Without Calling a Pro

Are you tired of spending money on home repairs that you think you could probably handle yourself? Many common household issues are surprisingly easy to fix, and you might not need to call a professional for every little problem. With a bit of knowledge and the right tools, you can become your own handyman (or handywoman!). Here’s a list of 10 simple home repairs that most beginners can tackle without breaking a sweat:

1. Fixing a Running Toilet: If your toilet keeps running long after it’s been flushed, it’s usually due to a faulty flapper valve. This is a quick fix—simply replace the flapper, and your toilet should work like new. No more water waste or annoying noises!

2. Patching Small Holes in Walls: Whether it’s from hanging pictures or accidental damage, small holes in walls are an eyesore. Grab some spackling compound, fill in the holes, let it dry, then sand it smooth. Apply a coat of primer and paint, and the wall will look as good as new.

3. Unclogging Drains: Slow or clogged drains are a common nuisance. Instead of reaching for harsh chemicals, try using a plunger or a drain snake. These tools can often dislodge the blockage, and you’ll avoid pouring harmful substances into your pipes.

4. Replacing a Showerhead: Over time, showerheads can become clogged with mineral deposits, reducing water flow. Replacing an old showerhead is a straightforward task. Choose a new model, unscrew the old one, wrap some Teflon tape around the threads, and screw on the new showerhead. It’s an easy way to upgrade your shower experience!

5. Fixing a Leaky Faucet: Leaky faucets can waste a surprising amount of water. Often, the issue is a worn-out washer or O-ring. Disassemble the faucet, replace the worn part, and you’ll have a watertight seal again.

6. Tightening Loose Door Hinges: Doors may start to sag over time, causing them to drag on the floor. Tightening the screws in the door hinges can often solve this problem and ensure the door works smoothly again.

7. Replacing Furnace Air Filters: Regularly changing your furnace’s air filters is essential for maintaining good air quality and energy efficiency in your home. It’s a simple task that only takes a few minutes and can significantly improve your indoor environment.

8. Caulking Windows and Doors: Drafty windows and doors can drive up your energy bills. Inspect them for gaps, and if you find any, apply fresh caulk to seal them. This will keep the cold air out and your heating bills down.

9. Cleaning Gutters: Clogged gutters can lead to water damage and pest infestations. Regularly cleaning your gutters removes debris, allowing rainwater to flow freely and protecting your home’s exterior.

10. Fixing a Loose Door Handle: A wobbly door handle is usually caused by loose screws. Tighten the screws, and you’ll be amazed at how such a small fix can restore the handle’s stability.

There you have it—10 DIY home repairs that can save you time and money. Armed with a little knowledge and a few tools, you can tackle these tasks with confidence. So, roll up your sleeves and get ready to become the hero of your own home repair story!